Dimensions
- Head Dia.
- 0.9 inches (22.5 mm)
- Body Dia.
- 0.85 inches (22 mm)
- Length:
- 3.9 inches (100 mm)
- Weight
- 3 ounces (85 grams)1
Battery Type
- 1 x 18350 (protected and button-top)2
- Battery cell and the protection circuit must sustain 10A discharge
- Compatible battery size (diameter/length)
- 18-18.8mm/35-38.5mm
- Read precaution with li-ion batteries.
Operating voltage
- 2.7V - 4.2V
What's included
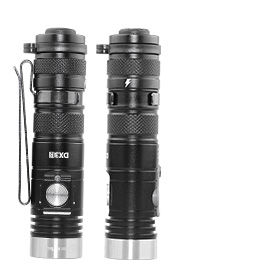
- DX3B MKII flashlight
- Stainless steel button switch
- Smooth stainless steel bezel
- Harden stainless steel deep pocket
two-way clip with titanium alloy dark vacuum coated finish - Forward clicky switch tailcap
- Rigid nylon holster w/ self-retention device
- Protected 3.7V 1300mAh 18350 rechargeable li-ion battery (10A discharge)
- Micro USB USB charging cable (3.3feet/1meter) w/ AWG24 copper wire
- Spare o-rings
- User Manual
- Mil-Spec Para-cord Lanyard w/ quick attachment clip
- Para-cord lanyard with quick attachment clip
- IPX-8 standard
- Smooth aluminum reflector
- HAIII hard anodization aerospace aluminum
- Waterwhite glass lens w/ harden treatment
- Anti-reflective (AR) coating on both side (96% transparency)
- 3.7V 18350 1300mAh li-ion protected battery (10A discharge)
- 5V USB car charger
- Lens
Carrying method
Waterproof
Reflector
Material
Lens
Optional accessories
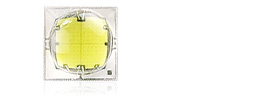
LED
- Luminus SST70 LB LED
Max output
- Luminus SST70 LB LED
- LED lumen: 3100
- ANSI FL-14 lumen: 2500
Beam Profile
Luminus SST70 LB LED- Center lux: 16,500 lux
- Center spot angle: x°
- Spill light angle: x°
- Beam distance: 280 yards / 257 meters
LED circuit
- W3000 RC
- Synchronous boost converter with ultra low resistance power mosfet which offers up to 96% efficiency and high voltage LED output
- (NEW!) Customizable startup level at MAX or second highest level
- Uses seven large capacity MLCC for input and output decouple
- Four layers FR-4 PCB for better heat transfer, lower EMC, and higher output power
- Uses molded power inductor for higher saturation current and less electromagnetic interference
- Current regulated output (non-PWM) for all brightness levels without flicking
- Low voltage output step-down at 3.1V (lowers MAX output to second highest level to extend remaining runtime)
- Built-in shut down voltage at 2.7V (if voltage reaches 2.7V in any non-AUX output, flashlight will switch to the lowest level, if voltage reaches 2.7V again, it will shut off)
- Active thermal management feature (adjustment range 60%-100%)5
- Zero standby current
Charging circuit
- L1000 Micro
- 5V USB input (requires 1A or higher)
- Dual mosfet design for maximum efficiency
- 1A MAX charging current
- Uses standard micro-usb charging plug
- Constant current / Constant voltage charging algorithm
- Small current charging for low voltage battery (less than 2.9V)
- Extends battery cycle life by charging battery that reads 4.1V or lower
- Precise voltage detection design +/- 1%
- No trickle charge
- Smart charging level report system
- A blue LED indicator under the main switch reports the estimated battery remaining capacity
- Flash once: lower than 15%
- Flash twice: 15%-40%
- Flash 3x times: 40%-70%
- Flash 4x times: higher than 70%
- A blue LED indicator under the main switch reports current charging level
- Flash once: lower than 50%
- Flash twice: 50%-75%
- Flash 3 times: >75%
- Constant on: 100% (done)
Battery level report
Charging level report (charging)
Output and Runtime
- Luminus SST70 LB LED
- Led lumen:
31005-1100/1100/480/190/25 - ANSI FL-1 lumen:
25005-950/950/400/160/22 - Runtime: 0.2-0.6/0.6/1.8/4.5/35 hours6
- Hidden auxiliary outputs7
- Disorienting Strobe / Beacon (1.67Hz)
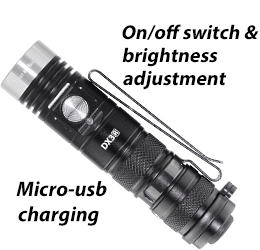
Operations
Basic operations:- Turn on the light at MAX (programmable) output by pressing the tailcap button until it clicks.
- Turn on the light at lowest output (programmable) by holding the side switch button while pressing the tailcap button until it clicks.
- For momentary on function, slightly press the tailcap button
- To switch between different brightness levels, press the side button switch w/ flashlight on
- To enter hidden auxiliary mode, press the side switch to cycle through two sets of standard output level to enter


Advanced operations:
- Programmable start-up feature: Turn the flashlight on and off 20 times (one second or less between each click) to set second highest (default), MAX, or MAX with tailcap strobe as tailcap startup level.
- Programmable start-up (w/ side switch depressed) feature: To program the lowest output start-up level to any other level, press the hold the side switch for at least five seconds at other output level to set it as the start-up output level (w/ side switch depressed).
- Tail strobe feature: Turn the flashlight on and off 20 times (one second or less between each click) to toggle this feature. With the tailcap strobe setting enabled, a double press of the switch button (within one second) will activate the strobe output.
- Remove the waterproof silicon cap, insert the charging power plug to charge. Charging without turning on the tailcap switch will enter ECO mode charging (80% capacity), or turn on the flashlight tailcap switch during charge for 100% capacity.
- Blue side LED indicates the battery is being charged. It reports charging percentage by blinking.
- When charging is done, remove the charging power plug and turn off the flashlight tailcap switch (wait for a few seconds to let the flashlight circuit to reset itself from charging lock-out status to normal status).
- When forcing the flashlight to start in high output mode using depleted battery, flashlight will blink to warn user that the battery is unable to keep up the high power input demand. User should switch to lower output and charge the battery as soon as possible.
Controls
Other features
- LED Copper MCPCB star board with DTP technology and direct heat path
- User replaceable glass lens
- Battery reverse polarity protection
- Ultra low internal resistance phosphor bronze springs (silver coated)
Warranty
- Ten years performance guaranteed warranty
- Read flashlight regular maintenance
Battery Safety Precaution
Ensure the protective circuit on the battery has current limitation of higher than 10A. Always use proven EAGTAC batteries for best performance and reliability.All EAGTAC flashlights are designed to use button-top battery (battery with protruding positive terminal). For rechargeable li-ion battery, use only EAGTAC li-ion battery, or other protected li-ion battery with compatible length and diameter. Before using the battery, check and ensure the battery outer wrapping (the isolating plastic film that wraps around the metal housing of the battery) is complete. Broken battery wrapping may lead to short circuit and damage to the flashlight.
Lithium and Li-ion battery can explode or cause burns if disassembled, shorted, or exposed to high temperature. Do not mix new and used batteries. Do not mix batteries with different brand, capacity, voltage, or install batteries backwards.
NiMH rechargeable battery may release gas during discharge. If you experience an inflated switch boot or find high pressure being built inside the flashlight, switch off the flashlight immediately. Slowly loosen the tail-cap to reduce the internal pressure and replace all batteries. Back to top
Flashlight Maintenance
Periodically clean the threads and o-rings with a lint free cloth and apply a thin coating of EAGTAC synthetic grease to the o-rings and threads. After prolonged exposure to moisture, the head and batteries should be removed, inspected, and dried. If you find any oxidation on the battery contact or on the flashlight contact, use a sharp tool to scrap it off. Do not touch or attempt to clean the reflector, as it will scratch the reflective coating permanently. Back to topAccessories

CR123A Lithium Battery
EAGTAC CR123A high performance lithium battery. 1700mAh capacity. PTC protected.

LED upgrade module
Upgrade to XP-L HI, XM-L2, XP-G2, Color, UV 365nm-370nm, 395nm-400nm, IR 850nm.

18650 Li-ion Battery
EAGTAC 18650 high performance li-ion rechargeable battery. 3100mAh / 3400mAh / 3500mAh capacity. IC protected. Japanese made cells.

Diffuser/color filters
Add-on diffuser filter to transform into a flood beam. Choose from red, yellow, green, blue color filter.
- Includes batteries
- Battery with protruded top must used in this flashlight.
- Beam output diameter taken at one meter
- ANSI FL-1 Lumens is a measurement of light output standardized by American National Standards Institute for use with flashlights. This ANSI Lumen measurement is the total overall light output being emitted from the flashlight. This measurement is generally more accurate as it takes into consideration the loss from reflector/lens/bezel. EAGTAC’s ANSI Lumen output is measured with flashlight cold start-up using a calibrated integrated sphere.
- After 35 seconds at maximum output level (100%), the active thermal management feature will be activated and continuously adjusts the maximum output level according to the flashlight internal tempearture. The adjustment output range is between 30%-100%. This feature maintains the flashlight surface temperature to be about 140°F (60 °C) (higher surrounding temperaturemay result in higher flashlight temperature). It's normal for high power flashlight to run hot at MAX level. Reduce the output if the user finds the flashlight too warm to hold.
- Uses EAGTAC protected 18350 1300mAh li-ion rechargeable battery
- Maximum efficiency occurs when input voltage is very close to LED forward voltage.
- To charge a deeply discharged protected li-ion battery, the flashlight internal charging circuit will use small current to charge the battery. Usually it takes at least a few minutes for the charging circuit to bring the deeply discharged battery voltage to higher than 3.0V (which is the no-load voltage required to disable the over-charge lock-out on the battery protection circuit). If the protected li-ion battery fails to activate, contact our customer services about your situation and we may find other ways to activate it.
- Details and feature maybe subject to change without notice.